Hello!! Hope you all had a nice weekend. Thank you all for your lovely response on my mermaid purse!! :)
After completing one old project, it gave me a boost to complete other long pending projects. Although that doesn’t deter me from starting fresh ones. But I have slowed down on new ones.
I made this crochet fashion or hair clip organizer taking inspiration from an etsy product that I found on Pinterest. I added my own ideas to it. I started it, maybe, around 7 months back and then I ran out of yarn. It is made with a local branded purse thread (braided thread) using a 3.5 mm hook. It measures 15 inches wide and 20 inches in height (excluding hanger and including braids).

I haven’t jotted down the tutorial but I can describe basic steps to make it.
For the main body, I crocheted bands of HDCs (5 rows) alternating with bands of DTRs (1 row).
Before starting the main body, create button holes (skip 2 or 3 stitches) in the 2nd row of HDCs at frequent intervals depending on number of braids you want to hang.
Crochet SCs around all 4 sides as border and insert ribbons through the DTR rows sewing both ends on the back side.
On the top, for each hanging loop,
1. Crochet a 5 inch band of DCs skipping 1 DC (button hole) where you would like to put the button when you close the loop. I created two button holes in each loop at a distance of one inch.
2. Crochet as many loops as you need. I made 7.
3. Keeping the main body facing right side, sew wrong side of one end of the loop on top row. Repeat for all loops at equal distance.
4. Sew buttons on the main body on the top row/rows at the respective places based on your loops.
Add multiple strands of yarn as long tassels into the button holes at the bottom and make braids. I did not level the braids as Anshita wanted it to be like that. Earlier I had put some golden ribbons on the braids but it looked cluttered so I replaced those with plain colored stretch bands. Which one do you think looks good, the plain or with ribbon?

 I took an unused plastic hanger but it was black in color so I wounded a plain blue satin ribbon around and covered the metal loop with SCs . The center part of the hanger’s shape was not easy to wound so I wrapped a crochet square around it folding diagonally and sewed it.

I added another crochet square as a pocket and a crochet butterfly as an embellishment. The link to tutorials for these motifs can be found here.
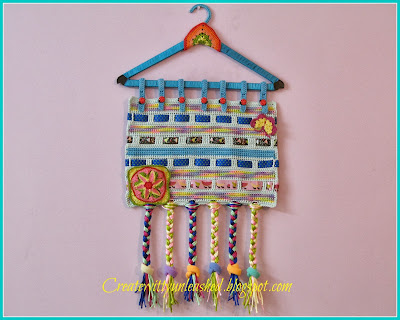
Add the accessories and Ta Daa !! The organizer is ready!! :)


I am also on the verge of completing one cross stitch design from turtle trot SAL and hopefully will share soon :)
Have a crafty week ahead!!
Preeti :)
After completing one old project, it gave me a boost to complete other long pending projects. Although that doesn’t deter me from starting fresh ones. But I have slowed down on new ones.
I made this crochet fashion or hair clip organizer taking inspiration from an etsy product that I found on Pinterest. I added my own ideas to it. I started it, maybe, around 7 months back and then I ran out of yarn. It is made with a local branded purse thread (braided thread) using a 3.5 mm hook. It measures 15 inches wide and 20 inches in height (excluding hanger and including braids).

I haven’t jotted down the tutorial but I can describe basic steps to make it.
For the main body, I crocheted bands of HDCs (5 rows) alternating with bands of DTRs (1 row).
Before starting the main body, create button holes (skip 2 or 3 stitches) in the 2nd row of HDCs at frequent intervals depending on number of braids you want to hang.
Crochet SCs around all 4 sides as border and insert ribbons through the DTR rows sewing both ends on the back side.
On the top, for each hanging loop,
1. Crochet a 5 inch band of DCs skipping 1 DC (button hole) where you would like to put the button when you close the loop. I created two button holes in each loop at a distance of one inch.
2. Crochet as many loops as you need. I made 7.
3. Keeping the main body facing right side, sew wrong side of one end of the loop on top row. Repeat for all loops at equal distance.
4. Sew buttons on the main body on the top row/rows at the respective places based on your loops.
Add multiple strands of yarn as long tassels into the button holes at the bottom and make braids. I did not level the braids as Anshita wanted it to be like that. Earlier I had put some golden ribbons on the braids but it looked cluttered so I replaced those with plain colored stretch bands. Which one do you think looks good, the plain or with ribbon?


I added another crochet square as a pocket and a crochet butterfly as an embellishment. The link to tutorials for these motifs can be found here.

Add the accessories and Ta Daa !! The organizer is ready!! :)


I am also on the verge of completing one cross stitch design from turtle trot SAL and hopefully will share soon :)
Have a crafty week ahead!!
Preeti :)